Showing posts with label Projects. Show all posts

Thursday, August 7, 2014

Kitchen Revamp

When Levi finished his FTO (field training) and went to his solid 4 days on/3 days off schedule, he decided it was time to really start a house project. I'm thinking Great! Let's paint the laundry room, or a bathroom! Ooo or we could buy new shutters for the front of the house.... or change out some of the more hideous light fixtures...  Small projects. Easy stuff. Things that we could ease into, as neither of us have done any real home remodeling before. So where do we start?

Kitchen. Overhaul. O_o    So much for starting off small haha.

The before. Very basic. Very 90s. Very dirty dishes.

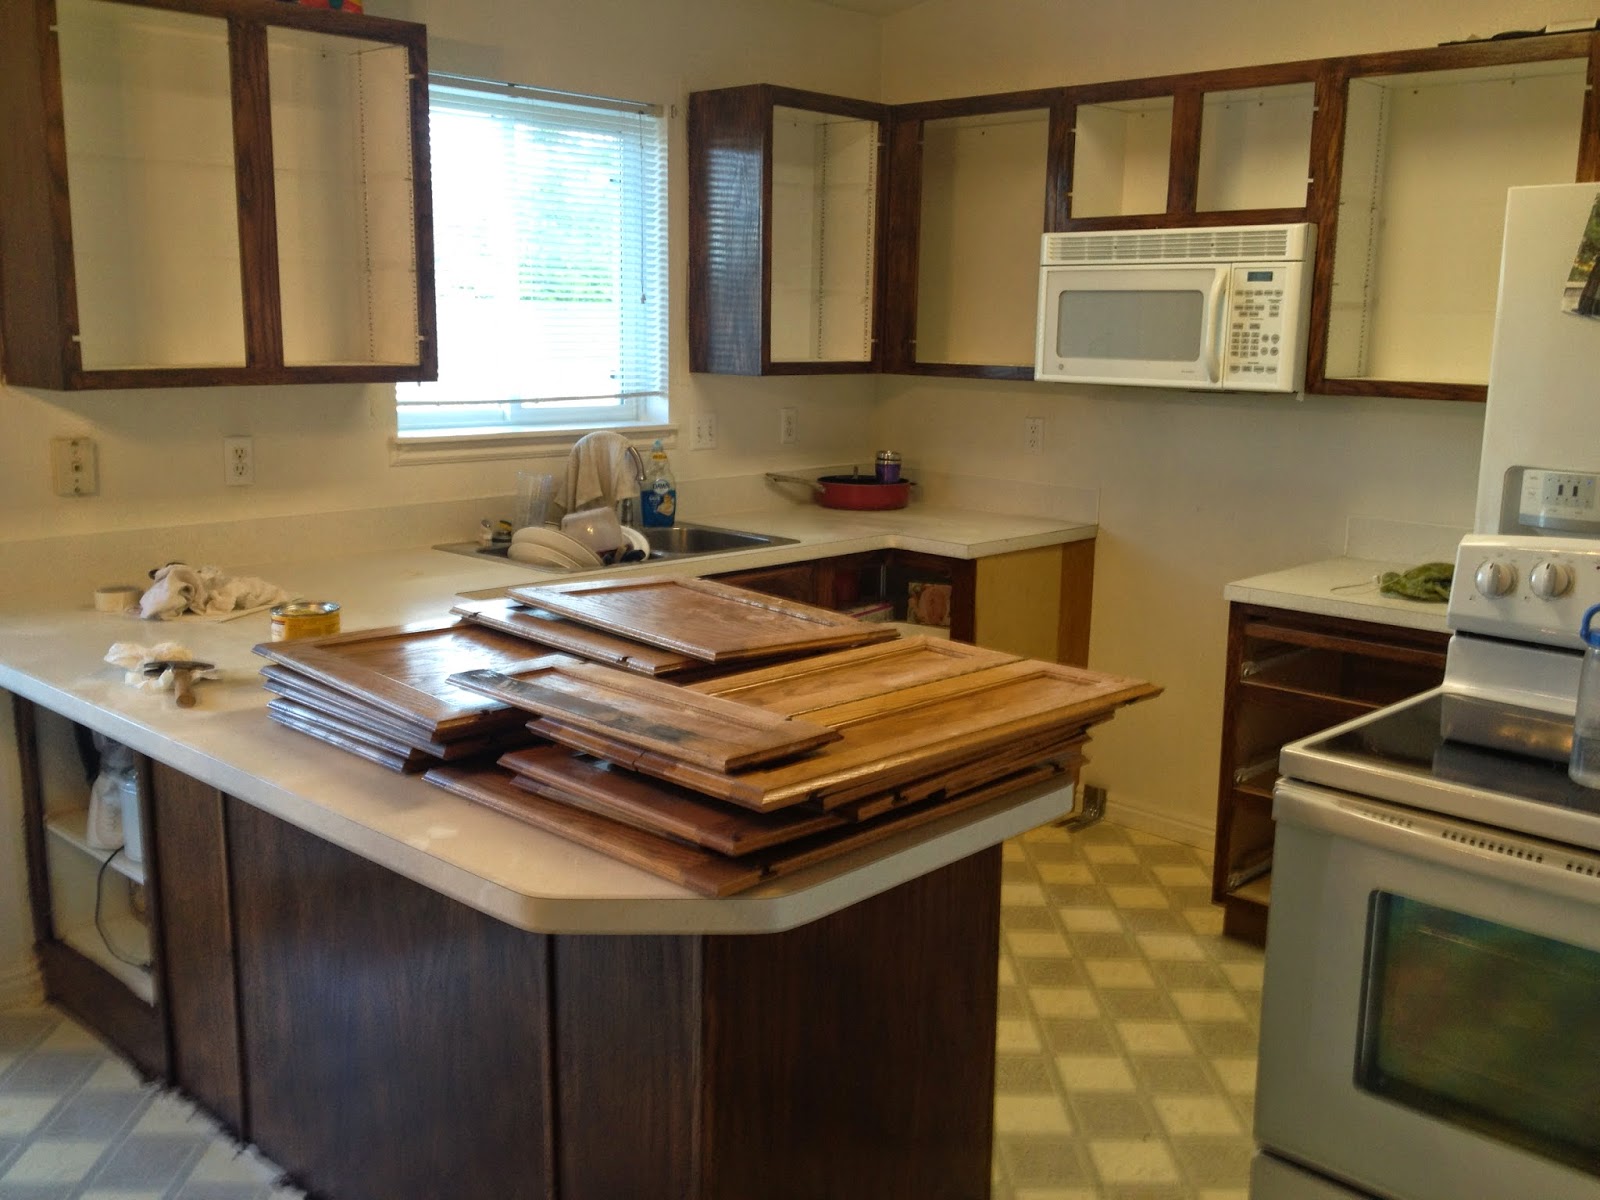
The cupboards were that lovely honey oak color that is found in almost every house built in the '90s... and Levi knew I would be thrilled to see it gone. However I nearly had an anxiety attack when I came home that night and my kitchen looked like this.

EEK!!
By that evening, the attached cupboards were sanded and Levi had one coat of gel stain on them all. He moves pretty dang fast!


While Levi continued staining, I started sanding the doors and drawer fronts as fast as I could. (I'd be ok with never seeing sand paper again in my life....) After 48 hours, we finally had all the staining done, new silver hinges and knobs screwed on, and the doors reattached. And it changed the feel of the whole room!

But then our blehh '90s counters stood out even more.... such a lovely off-white with blue and pink flecks. (Althought they went so great with the nasty floors.) So I looked at tons of DIY counter ideas on Pinterest and we fashioned our own method mostly based off this one. The short version: rolled on black paint, used a natural sponge to apply brown & beige paint, and then sealed it all with a clear coat epoxy. 

And they turned out like this! I was pretty dang impressed with Levi's painting skills.

(This is before the clear coat, which seemed to pull the colors
together even more.)

But we couldn't stop there! After finally agreeing on some aluminum back splash tiles from Amazon, replacing the worn out white outlets with black ones, buying a new light fixture for over the sink, and painting the walls "Quite Red", we were DONE!  I'm so impressed with Levi's handyman skills!!!


Next year: replacing all of the flooring in the house. All of it. But for now, it's time to move on to painting all the other rooms I think . . . 

Tuesday, April 15, 2014

Crockpot Freezer Meals = SUCCESS!

Last Saturday, Mom and Morgan came down and helped me prepare a bunch of freezer meals - and it was awesome. If we hadn't kept stopping to chat, and stopped for lunch, we would have been done in less than two hours guaranteed. Two hours of work and now I have 10 meals that I can pull out whenever I need to, throw one in the crockpot on my way out the door, and it will be ready when I get home from work. I'm stoked.

I shared my before and after pictures on facebook and several people asked for the recipes, but I couldn't find a good way to just share my word document on FB. So I figured I would just post it here for the world to see. And also so I will be able to personally find and use it again after my laptop finally bites the dust..... probably any day now....

A lot of the recipes were from this blog, and I just simplified her instructions. I strongly suggest looking at the other recipes she has if you want more ideas. They all sound great!

In the beginning, your kitchen will probably look like this:


But by the end, your freezer should look like this: 

The meatballs are not part of any of THESE freezer meals, but they are part of my freezer meal system.
Hence why they are included on one of the shelves of honor.

Not too shabby. :) All instructions and ingredients are below. Good luck! 

List of Included Recipes:
  • Hawaiian Chicken
  • Chicken Fajitas
  • Dijon Chicken
  • Taco Roast
  • BBQ Chicken or Pork
  • OVEN Chicken and Broccoli
  • Jambalaya
  • Taco Soup

Disclaimer: Except for the Jambalaya and Taco Soup, we have not yet tasted any of these recipes….. So I can’t personally guarantee how awesome they are, but they all had rave reviews online!
And they are all now in my freezer, so I can provide reviews after the next couple weeks. :)

Start by labelling each Ziploc freezer bag (at least 1 gallon size) with the name of the recipe and the included cooking instructions. Chop and dice all of the chicken, peppers, onions, etc. and then begin assembling the meals. For each of the below meals, all ingredients should be thrown together in their Ziploc freezer bag raw (unless something is specified as COOKED) and then put the bag in the freezer until ready to cook. Enjoy!

Helpful tips:
  • All meals are intended for the crockpot unless it says otherwise.
  • For crockpot cooking times, all crockpots vary slightly but usually 6-8 hours on low = 3-4 hours on high in my experience.
  • With most of the chicken meals, you can either chop the chicken before adding it to the recipes (which makes them cook faster) OR throw the chicken breasts into the bag whole (ideal if you buy frozen chicken breasts; do NOT thaw chicken and then try to refreeze without cooking it).
  • Some of the recipes call for 1 lb. of chicken instead of specifying how many breasts…. I figured 1 lb. = 2 large chicken breasts or 4-5 smallish ones.
  • For the meals with lots of spices and seasonings, we tried to squish and shake the bag around after sealing it to mix them all together a little before freezing.
  • A full ingredient list can be found at the very end. Ü


Hawaiian Chicken
(4-5 servings)

4 large boneless, skinless chicken breasts
½ cup white sugar
½ cup vinegar
3 garlic cloves, minced
2 Tbsp. soy sauce
½ can of large pineapple chunks
½ cup of pineapple juice (use what’s in the can)

Cook in crockpot 4-5 hours on high or 6-7 hours on low. Serve it over rice and enjoy. While cooking the rice, you can shred the chicken and put it back in the juice before serving it.


Chicken Fajitas
(5-6 servings)

1½ pound chicken breast
2 peppers (your favorite)
1 onion
½ cup chicken broth
1 taco seasoning packet
1 tsp. chili powder
½ tsp. paprika
1 tsp. salt

Cook in crockpot on high for 3-4 hours or low for 5-6 hours. When it’s cooked, shred the meat and add it back to the pepper mixture and serve on warm tortillas with your favorite toppings.


Dijon Chicken
(4-5 servings)

2 pounds chicken breasts
1 cup chicken broth (or 1 cup water & 1 Tablespoon bouillon)
1 onion, chopped
2 Tbsp. Dijon mustard
3 cloves garlic, chopped
2 bay leaves (optional)
½ – 1 tsp thyme (depending on how much you like thyme)

This can be baked in the oven for 35-40 minutes in the sauce or can be cooked in the crockpot for 6-8 hours on low.


Taco Roast

1 (2.5 lb.) chuck roast (or whatever kind of roast you have)
1 (14 oz.) can beef broth
1 1/2 Tbsp. chili powder
1/2 Tbsp. cumin
1/2 Tbsp. onion powder
1 tsp garlic powder
1 tsp salt
1/4 tsp freshly cracked black pepper
Juice of 1 lime

Serve in tortillas or as a sandwich or on a salad... Cook in crockpot on low 6-8 hours. It might need some extra seasoning with salt and pepper once the beef is mostly cooked.


BBQ Chicken (or Pork)

4-5 chicken breasts or 1 large pork roast
20 oz. your favorite BBQ sauce
½ white onion, sliced or diced

Cook in crock pot on high for 3-4 hours. Shred the meat. Put it on a bun and top with crispy bacon slices.


OVEN Chicken and Broccoli
(3-4 servings)

1 pkg frozen broccoli spears
2 cans cream of chicken
2 cups COOKED chicken pieces (or 2-3 cans of precooked chicken)
1 cup mayo
1 tsp. lemon juice
¼ cup grated cheddar
1 cup COOKED rice

Combine all ingredients. Pour in bag and freeze. When ready to bake, top with ¼-½ cup more grated cheese. Bake at 350 for 30 minutes.


Jambalaya
(8-10 servings – mix this in a separate big bowl and then split into 2 freezer bags. Or halve the recipe if you don’t need it to make that much.)

1 pound chicken breasts - cut into 1 inch cubes
1 pound smoked turkey or pork sausage, sliced
1 (28 ounce) can diced tomatoes with juice
3 Tbsp. dried minced onion flakes (or ¼ cup diced fresh onion)
1 cup chicken broth
2 tsp dried oregano
2 tsp dried parsley
2 tsp minced garlic
2 tsp Cajun seasoning
1 tsp cayenne pepper (or regular red pepper flakes)
½ tsp dried thyme (optional)

Cook 7-8 hours on Low, or 3-4 hours on High. Serve over cooked rice.


Taco Soup
(8-10 servings – this one will also need to be mixed in a bowl and then placed in at least 2 bags, or cut the recipe in half)

1 lb. COOKED ground beef
1 large can corn
1 large can diced tomatoes with juice
2 cans kidney beans
2 cans black beans
1 packet Hidden Valley Ranch powder
1 packet taco seasoning

You can either drain the cans before adding them or not, it’s your preference. Draining them makes this more like a chili than a soup. Either way, don’t drain off the juice from the tomatoes. Cook in crockpot 6-8 hours on low.


Ingredient list:


  • 24-30 chicken breasts, depending how large and how much chicken you want in each meal.
  • 1 (2.5 lb.) chuck roast (or whatever kind of roast you have)
  • 1 pound smoked turkey or pork sausage, sliced
  • 1 large pork roast (unless you choose to do BBQ chicken instead of pork)
  • 1 lb. COOKED ground beef
  • 2 cups COOKED chicken pieces (or 2-3 cans of precooked chicken)
  • 1 cup COOKED rice
  • 2 peppers (your favorite)
  • 2 large onions
  • Lime juice
  • Lemon juice
  • 6-7 cloves garlic, minced (or a jar of pre-minced garlic)
  • 1 pkg frozen broccoli spears
  • ½ can of large pineapple chunks
  • ½ cup of pineapple juice (use what’s in the can)
  • 2½ - 3 cup chicken broth
  • 1 (14 oz.) can beef broth
  • 2 cans cream of chicken
  • 2 (28 ounce) cans diced tomatoes with juice
  • 1 large can corn
  • 2 cans kidney beans
  • 2 cans black beans
  • ½ cup white sugar
  • ½ cup vinegar
  • Soy sauce
  • Dijon mustard
  • 20 oz. bottle of your favorite BBQ sauce
  • 1 cup mayo
  • ½ cup grated cheddar
  • Dried minced onion flakes
  • 2 taco seasoning packets
  • 1 packet Hidden Valley Ranch powder
  • Chili powder
  • Paprika
  • Salt
  • Black pepper
  • Bay leaves (optional)
  • Thyme (optional)
  • Cumin
  • Onion powder
  • Garlic powder
  • Dried oregano
  • Dried parsley
  • Cajun seasoning
  • Cayenne pepper (or regular red pepper flakes)

Sunday, October 7, 2012

Living Room Revamped

When we bought our entertainment center almost 2 years ago, I told Levi I'd only get it if he promised we could paint it black. So this month, I decided it was time to finally revamp it. Cami has done lots of projects with spray paint and so she held my hand and helped me, layer by layer and can by can.

And so, we started out with a plain veneer entertainment center from Shopko.


After 5 cans of gray Valspar Perfect Finish Primer....


And FOURTEEN cans of Rust-Oleum Black Lacquer...


It is finally complete. :D


We've also been talking about getting a love seat for months, so I figured while we were in the middle of improving the living room we'd better do that too!

(Nevermind the random gun... this was in the middle of hunting season, after all.)
And since we were having fun with the living room, I decided to spruce up my plain, boring washer and dryer as well. I saw a blog about painting them a while back, but Levi said no way because they would just scrape and peel every time we move. Too much truth to that statement. So, I went with a simpler approach.


Vinyl stickers. Pretty whimsical, I know, but I like them. :D And I plan on changing the colors seasonally.

Now that we've got it all put together, it finally feels like home! 

Saturday, April 21, 2012

Why Helloo Summer, My Old Friend!

In front of the waterfall in Twin Falls Canyon
This was our very last picture of Summer 2011. And we have been anxiously awaiting the return of our favorite season. Thankfully it looks like we're not going to have to wait til July again for it to warm up. Woot!

Levi's been working SO hard to restore an old canoe that Mom and Dad Campbell let us bring down from the farm to Cache Valley. Apart from living through many Arbon winters and a few random bullet holes, it has also been sawed in half and patched back together at some point in its sad life. But Levi was bound and determined to make it float.

After spending over 30 hours sanding, patching, priming, spraypainting and putting new PVC pipe on the edges, Levi said it was time for a test run. (He also ingeniously sprayed the inside of the canoe with a rubberized undercoating, because no one wants to get fiberglass slivers from sitting in canoe.)

And our finished product:


Hooray, she floats!! Levi's giddy with excitement at the prospect of a whole summer devoted to fishing. I'll have to post a picture of it from the outside later. Well done, love, well done. Ü